How to Create a Translator Onboarding Process That Saves 5 Hours a Week
Key Takeaways
- A structured translator onboarding process can save at least 5 hours per project week by eliminating repetitive clarifications, reducing rework, and streamlining admin tasks.
- Three core levers drive time savings: a focused initial brief that pre-answers common questions, an actionable reference kit translators can absorb quickly, and a single streamlined communication and QA loop.
- Using a translation management system with translation memory, glossary enforcement, and automated QA checks makes these savings repeatable across every batch.
- A clear “definition of done” with explicit pass/fail criteria cuts QA ping-pong and prevents debates over subjective quality standards.
- Once your onboarding template is built and tested, it can be cloned and lightly customized for new languages, vendors, and content types—compounding your efficiency gains over time.
Introduction to Translator Onboarding
Translator onboarding in 2024–2025 has evolved well beyond handing over files and hoping for the best. With continuous delivery models now standard—weekly feature releases, simultaneous multi-language launches, and constant marketing updates—unstructured onboarding simply cannot keep pace. The localization process demands a systematic approach from day one.
Here’s the problem most teams face: without proper onboarding, localization managers routinely spend 3–5 extra hours per week per active language answering translator questions, fixing errors caused by unclear instructions, chasing status updates, and sorting out tool access issues. Multiply that across multiple languages, and you’re looking at a significant drain on your productive workforce.
The goal of this article is to give you a concrete, repeatable onboarding framework you can implement in under two weeks. Whether you’re working with freelance linguists, translation agencies, or in-house translators across software, marketing, or documentation, this process applies. What follows is a step-by-step playbook—not generic theory—that will help you create a seamless experience for every new translation partner.
Designing Your Translator Onboarding Workflow (Saving 5 Hours a Week)
Time savings don’t happen by accident. They come from designing an onboarding workflow that directly attacks the places where hours disappear: clarification emails, formatting errors, inconsistent terminology, and repeated QA cycles.
Consider a simple baseline scenario: one product team, 3 active languages, weekly release cadence. Without structured onboarding, you might see 10–15 translator questions per week, 2–3 rounds of QA per batch, and constant back-and-forth about tool access or file versions. That’s easily 5+ hours of management time that could go toward higher-value work.
An optimized translator onboarding workflow includes these main stages:
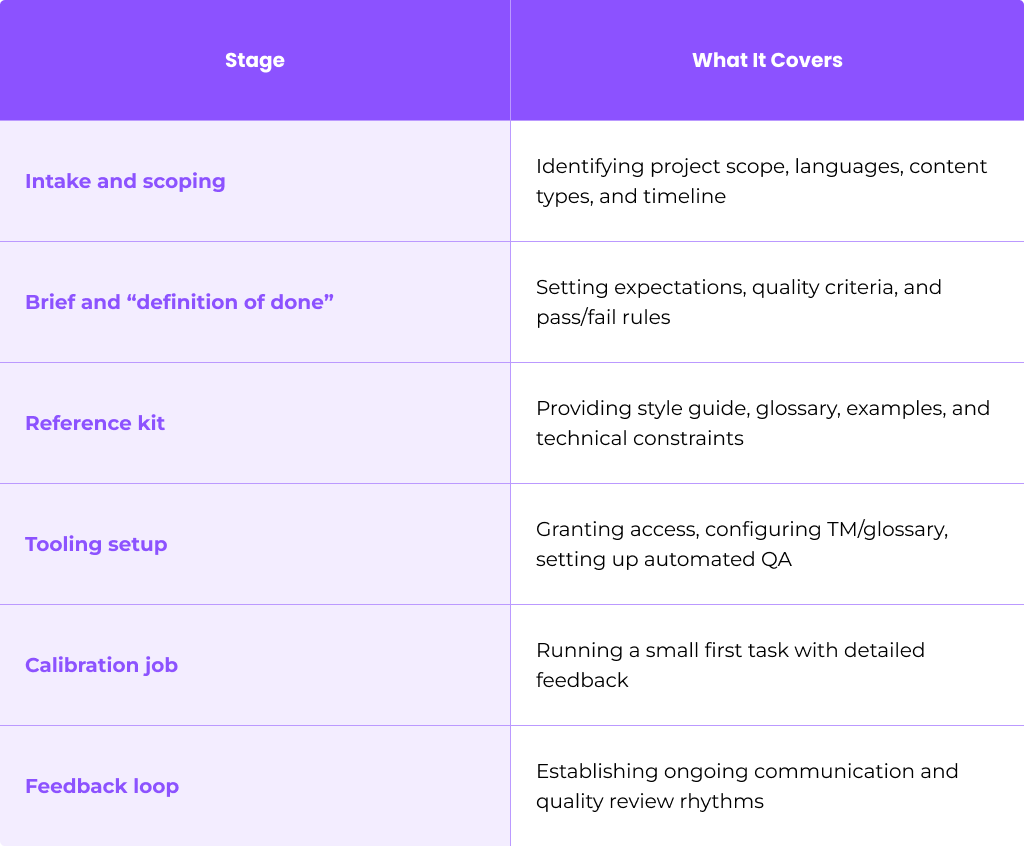
Each section that follows dives into one or more of these stages with concrete instructions. By the end, you’ll have a clear plan to map your workflow from “Invite translator” to “Steady-state production.”
Start with a High-Impact Translator Brief
A focused, reusable translator brief can save 1–2 hours a week by itself. How? By pre-answering the questions translators would otherwise ask via email or chat, slowing down delivery and creating noise for your project manager.
Your one-page brief should cover:
- Product overview: What does the product do? Who uses it? What problem does it solve?
- Target markets: Which regions or countries are you localizing for?
- Primary audience: Who will read this content—end users, enterprise clients, developers?
- Business goals for localization: Are you prioritizing speed-to-market, premium quality, or cost efficiency?
Include 2–3 concrete user personas with short descriptions. For example: “A first-time mobile banking user in Germany in 2025, aged 25–35, who expects a smooth transition from the English app experience.”
Detail your brand voice with 5–7 adjectives and paired examples:
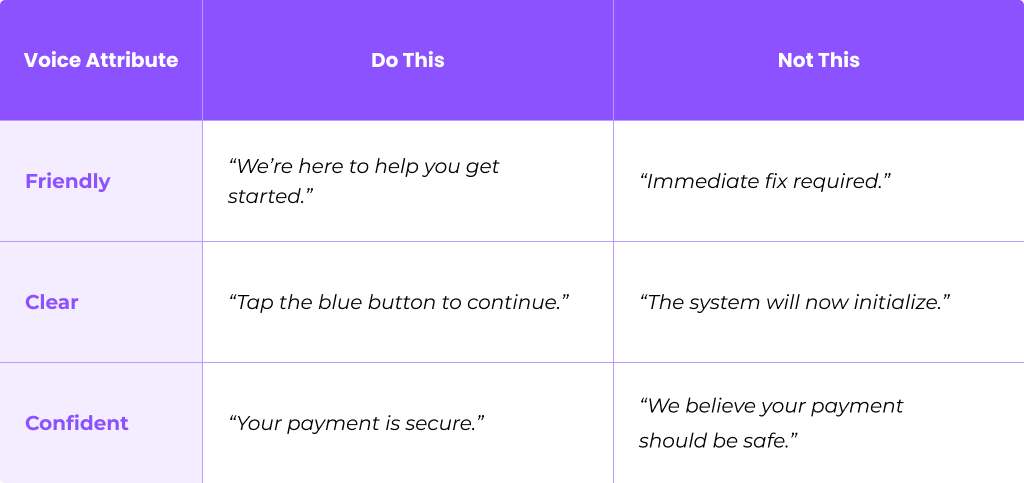
Add real screenshots or text samples from live product screens, emails, and help center articles. Translators need to see where strings appear in context—this alone prevents countless clarification questions about tone, length, and formatting.
Store this brief in a shared location (your TMS project resources or internal wiki) and update it at least once per quarter.
Define “Done”: Your One-Page Acceptance Checklist
A clear “definition of done” eliminates debates and reduces QA ping-pong. Without it, every review cycle turns into a negotiation about what counts as an error. With it, you can save at least an hour per review cycle by setting explicit pass/fail rules.
Create a one-page checklist format with these components:
Error severity levels with concrete examples:
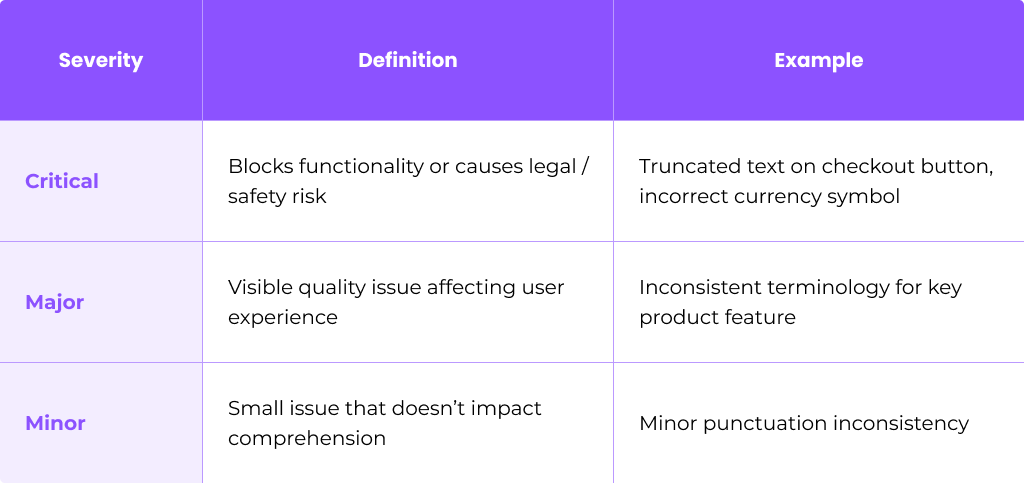
Map these severities to a simplified MQM-style schema, but express them as real scenarios your translators will encounter. For instance: “A truncated navigation label on mobile = critical because users can’t complete tasks.”
Pair this checklist with automated preflight QA—spellcheck, placeholder matching, length checks, glossary enforcement—before human review starts. This catches low-hanging errors automatically and lets your reviewers focus on higher-level accuracy and accuracy issues.
Share this checklist with translators on day one. Review it together during the first calibration job so everyone is on the same page about what “done” actually means.
Build a Translator Reference Kit They Can Absorb in 30 Minutes
The reference kit is your translator’s starter pack. If it takes longer than 30 minutes to absorb, it’s too long. If it’s incomplete, you’ll spend hours filling gaps via email.
Essential components include:
- Style guide: Punctuation rules, date/number formats, capitalization preferences, brand name treatment
- Glossary/term base: Approved translations for domain-specific terms with definitions and context
- Do-not-translate list: Brand names, product names, technical terms that stay in the source language
- Example approved translations: At least one fully translated version in a target language as a model
- Reference product materials: Source-language screens, emails, and push notifications
Your style guide should address common localization questions upfront:
- How do you format dates? (DD/MM/YYYY vs. MM/DD/YYYY)
- What’s the preferred number format? (1,000.00 vs. 1.000,00)
- How do you handle brand names in translated content?
- What capitalization rules apply to UI elements?
Include technical notes: placeholder usage, ICU message examples, character limits for critical UI fields, and RTL/CJK constraints where relevant. These details prevent formatting errors that cause rework.
Centralize this kit inside your translation tool or a shared drive. Version everything with clear “last updated” dates so translators always know they’re using current guidance.
Choose and Configure the Right Tools for Translators
Your tooling decisions directly affect admin overhead and translator ramp-up time. The right setup reduces friction; the wrong one creates bottlenecks.
TMS/CAT tool approach:
A Translation Management System with CAT (Computer-Assisted Translation) features gives you:
- Built-in translation memory and glossary enforcement
- Automated QA checks (spelling, placeholders, length)
- Role-based access control
- Inline context via screenshots and comments
- Version control and project dashboards
For TMS setup, cover these essentials:
- Create translator accounts with role-based access (translator vs. reviewer vs. admin)
- Connect your translation memory and import any existing approved translations
- Configure glossary with your approved terminology
- Set up automated QA rules (placeholder matching, forbidden terms, max length)
Typical TMS features that support onboarding include the suggestions panel, comments, screenshots, segment history, and keyboard shortcuts.
File or Git workflow approach:
If your team uses file-based or Git-based workflows, you need different structures:
- Expose i18n keys with descriptive context via code comments
- Add metadata fields that carry context for translators
- Set up CI jobs that handle string extraction and delivery
- Document where translators should work (repository URLs, folder structures)
Whichever approach you choose, document clearly where translators should work, how they log time or word counts, and who to contact for access issues.
Optimize Your Localization Process Inside the Tool
Process clarity inside your translation tool reduces translator guesswork and cuts clarification rounds. When translators know exactly how the system works, they can focus on producing accurate translations instead of asking procedural questions.
Translation memory leverage:
Explain how TM works and why it matters:
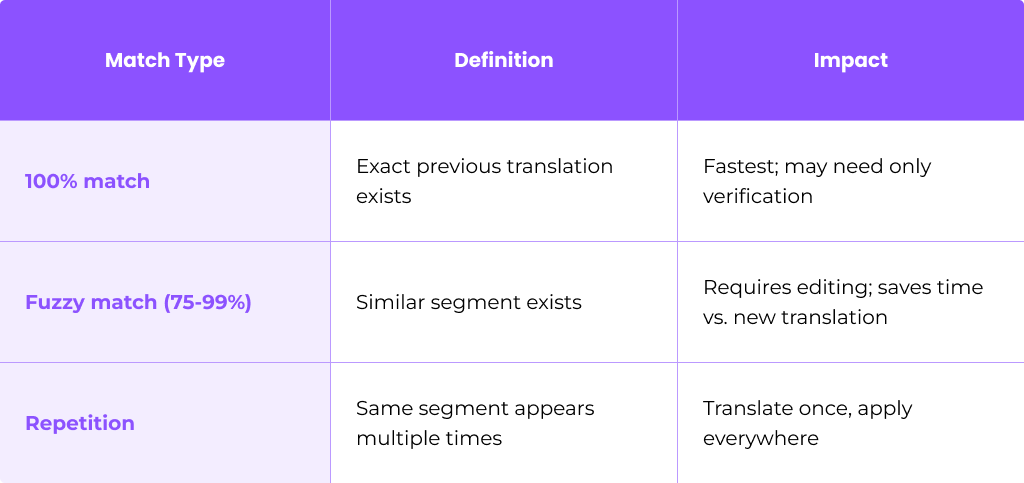
Clarify how TM matches affect both speed and payment. Many teams pay reduced rates for high matches since less work is required.
Segmentation and tagging:
Configure segmentation rules so content splits logically. Tag string types (UI, legal, marketing) so translators understand the tone and constraints for each segment. Add custom fields that carry context—character limits, screenshots, developer notes.
Machine translation policy:
Be explicit about your stance on machine translation:
- When is MT allowed (first pass, never, specific content types)?
- Which provider do you use?
- What level of post-editing is expected (light edit vs. full)?
Without this clarity, you’ll see inconsistent quality and confused translators.
Operational metrics:
Track a basic set of metrics and share them with translators:
- On-time delivery rate
- LQA score by batch
- Rework percentage
- Cycle time from assignment to approval
Visibility builds accountability and helps identify where the localization process needs improvement.
Run a Calibration Job to Set the Quality Baseline
Calibration is a small, intentional first job designed to align expectations before production begins. A well-run calibration round can save multiple hours each subsequent week by preventing systematic errors from repeating.
Select representative content:
Choose a short but representative sample—800–1500 words covering:
- Main tones (friendly marketing vs. formal legal)
- UI strings with character limits
- Tricky edge cases (plurals, ICU selects, cultural nuances)
Set a tight deadline:
Give 48–72 hours for the calibration job. A tight turnaround keeps the feedback loop fresh and focused.
Run LQA and debrief:
After delivery, run an LQA review using your one-page checklist. Then host a 30–45 minute call or written debrief with:
- Side-by-side examples showing original and translation
- Specific comments on what worked and what needs adjustment
- Questions from the translator about unclear areas
Document decisions:
Update your style guide and glossary based on calibration findings. If you decided that a specific phrase should always be translated a certain way, add it to the glossary. If you discovered a constraint (like a 20-character limit on button text), add it to your reference kit.
Make Context Effortless for Translators
Lack of context is one of the largest sources of delays and errors in translation projects. When translators can’t see where a string appears, they guess—and guessing leads to rework.
Attach visual context:
Whenever possible, attach screenshots or UI previews directly to strings in your translation tool. Most modern technology platforms support this.
Provide functional access:
Give translators access to staging builds, demo accounts, or interactive previews. Seeing strings in motion helps them understand length constraints, adjacent text, and user flow.
Add developer notes:
For complex keys—plural forms, ICU selects, system-generated messages—include functional descriptions. For example: “This string appears when the user has {count} items in cart. Use proper plural form.”
Mark non-translatables:
Establish a simple convention for marking:
- Brand names that stay in the source language
- Variables and placeholders
- Technical terms on the do-not-translate list
A clear marking system prevents unnecessary questions and keeps translators focused on actual translation work.
Set Clean Communication Lines and Response SLAs
Scattered communication—multiple channels, long delays, unclear responsibilities—wastes hours and causes missed release windows. Open communication is vital, but it needs structure.
Designate a single primary channel:
Choose one primary place for translator questions: in-tool comments, a dedicated Slack channel, or a shared email alias. Don’t let questions scatter across personal emails, random threads, and tool comments simultaneously.
Set response-time expectations:
Be explicit: “We respond to translator queries within one business day. For urgent blockers, use [escalation path].”
Define clear roles:
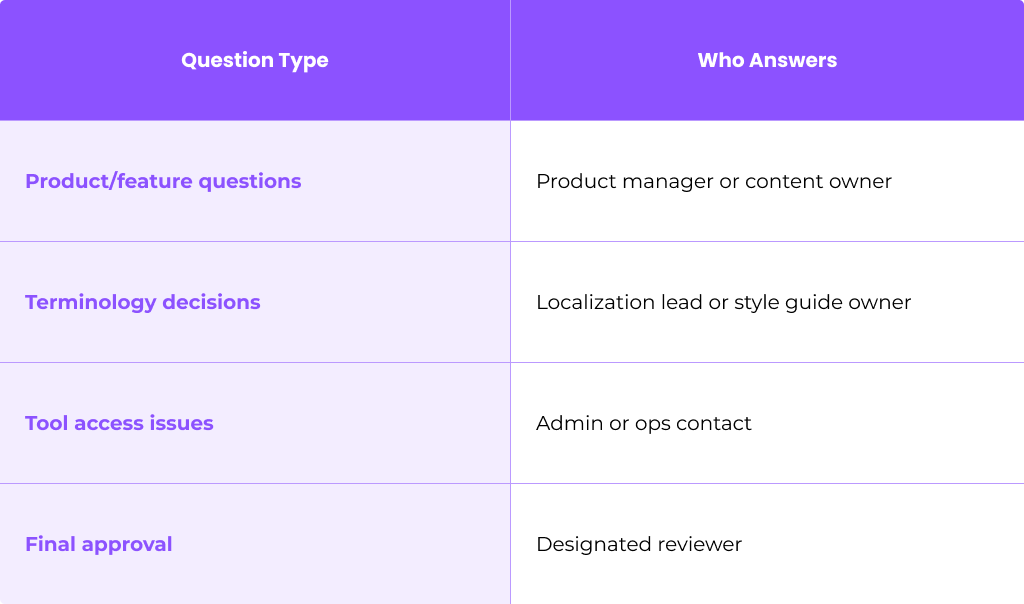
Establish etiquette guidelines:
- Ask concise questions, one topic per thread
- Always link to string IDs or include screenshots
- Use context tagging for quick triage
- Avoid mixing multiple issues in a single message
Cover Legal, Security, and Compliance Up Front
Modern localization often touches regulated data and confidential roadmaps. Clarifying legal and security requirements at onboarding avoids delays when auditors or compliance teams review your workflows later.
Basic legal artifacts:
Finalize these before work starts:
- NDAs covering confidential product information
- Contractor or vendor agreements with clear terms
- Data-processing clauses if translators will see any personal details
Data-handling rules:
Establish clear expectations:
- No copying production user data
- Mask or anonymize any real examples
- Use secure file-sharing or VPNs where relevant
- Follow GDPR or regional privacy requirements
Include a security brief:
Add a compact “security brief” to your onboarding materials outlining:
- What files translators can access
- What is strictly off-limits
- How to handle sensitive content if encountered
This protects both your organization and your translation partners.
Align on Rates, Units, and Payment Rhythm
Transparent commercial terms prevent friction and last-minute disputes that consume management time. Address these details upfront so everyone can focus on delivery rather than admin.
Payment units:
Common options include:
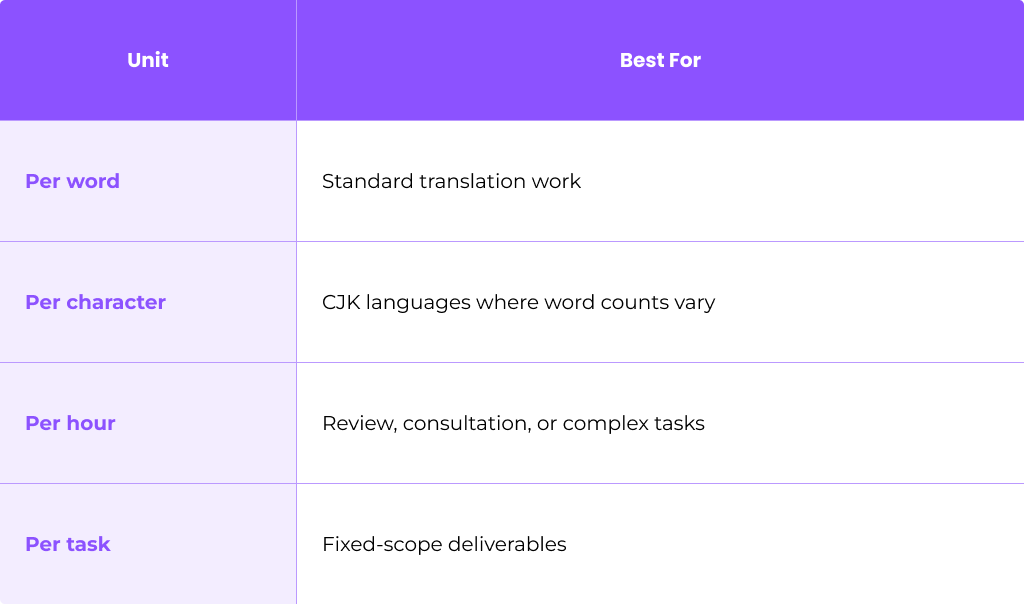
Explain which unit your team prefers and why.
TM match treatment:
Clarify how translation memory matches affect payment. For example:
- 100% matches: 30% of full rate
- Fuzzy matches (85-99%): 60% of full rate
- New segments: full rate
Post-editing MT:
If you use machine translation, address post-editing explicitly:
- Target quality level (light edit vs. full)
- Expected speed (faster than from-scratch translation)
- Fair rate adjustment
Invoicing cadence:
Specify invoicing rhythm (monthly on the 1st, net 30 days), required invoice format, and any purchase order references needed.
Create Feedback and LQA Loops That Actually Improve Quality
Feedback should be structured and timely—not sporadic or purely critical. Without regular feedback loops, translation quality stagnates and recurring issues never get addressed.
Sample each batch for LQA:
Use your one-page checklist to review a representative sample from each batch. Document scores by category (accuracy, terminology, fluency, formatting).
Share feedback effectively:
When providing feedback to translators:
- Use annotated examples showing the issue and preferred solution
- Link to updated style guide entries when adding new rules
- Summarize patterns rather than listing isolated comments
- Recognize strong translations to reinforce correct approaches
Establish a regular cadence:
Schedule a brief monthly quality review per language where recurring issues and improvements are discussed jointly. This builds ongoing support for continuous improvement rather than one-time corrections.
Balancing criticism with recognition builds trust and encourages translators to invest in learning your product’s voice.
Pilot First, Then Scale Your Onboarding Template
Treating onboarding as a pilot project reduces risk and surfaces flaws before you roll out to all languages. Don’t try to onboard 10 languages simultaneously with an untested process.
Start small:
Choose one language and one main content type (UI strings or marketing emails) for the first 4–6 weeks.
Track breakdowns:
During the pilot, identify where the onboarding flow breaks down:
- Missing context causing confusion
- Unclear “done” criteria leading to disputes
- Tool access issues slowing delivery
- Gaps in reference materials
Iterate before scaling:
Update your brief, reference kit, and QA checklist based on pilot findings. Fix the holes before adding more languages or vendors.
Clone and customize:
Once tuned, the same onboarding template can be cloned and lightly customized per target market. This compounds your time savings across every new language you add.
Respect UI and Layout Constraints from Day One
Layout problems can derail releases and cause multiple cycles of rework. When translated content doesn’t fit the UI, someone has to fix it—and that takes time.
Communicate character limits:
For critical UI elements, specify exact limits:
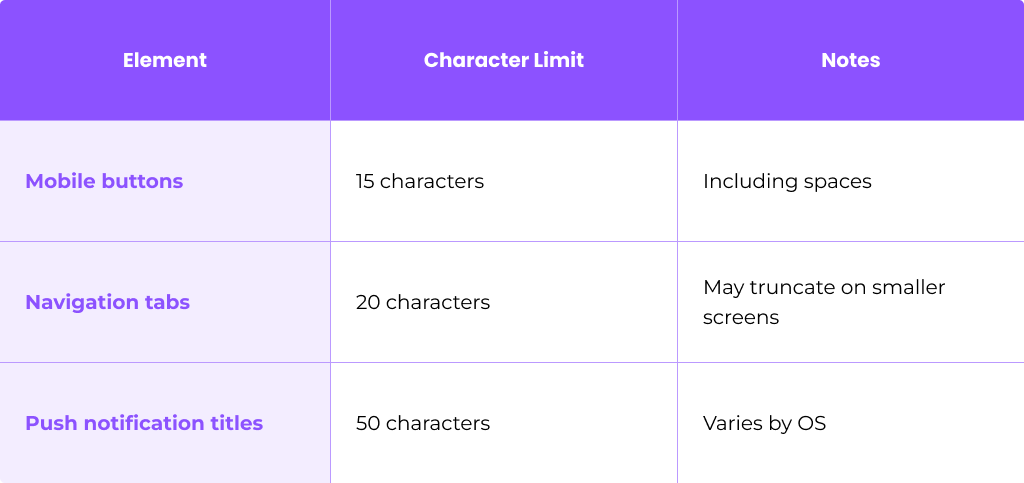
Share ICU message patterns:
Provide examples of plural and select patterns in both source and target languages. For example:
{count, plural, =0 {No items} =1 {1 item} other {# items}}
Address RTL and bidi:
For bidirectional and RTL languages, explain mirroring logic and how to test on devices or staging builds.
Clarify visual QA responsibility:
Document who is responsible for visual QA (linguists, designers, or product owners) and how layout issues should be logged and resolved.
Keep Terminology and Domain Knowledge Alive
Terminology and domain understanding aren’t one-time tasks. They require ongoing maintenance as products, regulations, and markets evolve.
Review glossary entries regularly:
Schedule quarterly reviews of your glossary. Products change, features get renamed, and regulations introduce new terms. Your glossary needs to keep pace.
Invite translator contributions:
Encourage translators to propose new terms with required fields:
- Definition
- Context sentence
- Reference link or screenshot
Broadcast updates:
When you approve glossary changes, broadcast them to all translators and sync updates into your translation memory for consistency.
Add domain primers:
For complex industries—fintech, healthcare, legal—add a short “domain primer” to your onboarding materials. Cover key concepts, must-keep phrases, and regulatory terminology that translators need to understand deeply.
Measure What Actually Saves Time
To credibly claim 5 hours a week saved, you need to track a small set of meaningful metrics. Without measurement, you’re guessing.
Key metrics to track:
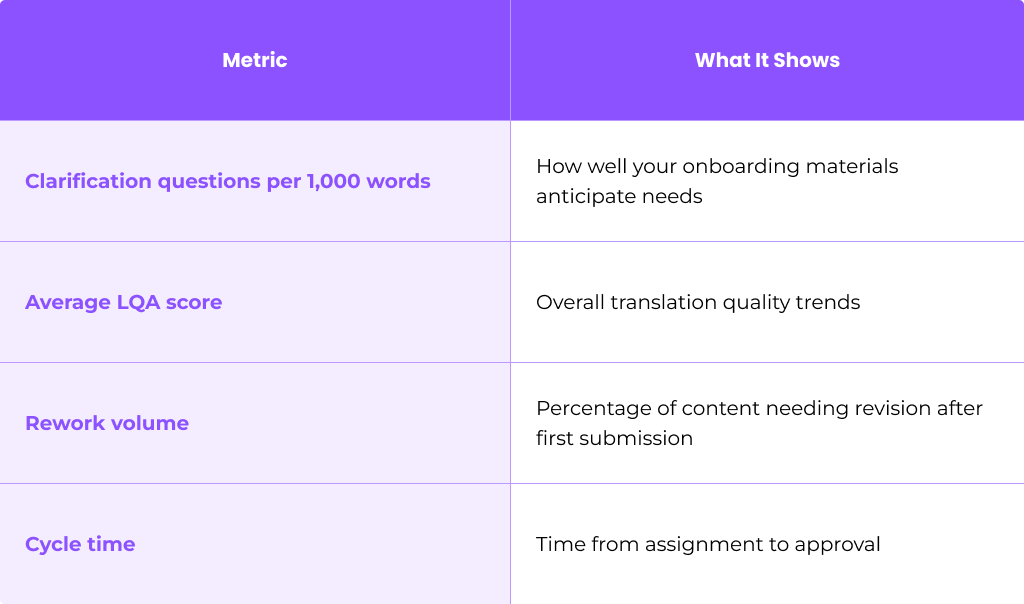
Create a simple dashboard:
Use a spreadsheet or tool-based dashboard to track these metrics by language and by month.
Compare before and after:
Document your baseline before implementing the new onboarding process. After 4–6 weeks, compare metrics to show concrete time savings and quality gains.
Share with translators:
Publishing metrics builds transparency and encourages joint problem-solving. When translators see their LQA scores improving, they stay motivated to maintain quality.
Maintaining a Healthy Bench of Onboarded Translators
Relying on a single translator per language is risky. When your primary linguist is unavailable during a peak period, you face delays—or you rush someone untrained into production, creating quality problems.
Keep backup translators ready:
Maintain 1–2 backup translators per major language who have completed at least a light version of your onboarding flow.
Assign periodic tasks:
Give backup linguists small, low-risk tasks periodically so they stay familiar with your product, style, and tools. This prevents knowledge decay.
Store onboarding records:
Keep records of each translator’s onboarding status:
- Briefs read and acknowledged
- Calibration job completed
- LQA results from first batches
This allows you to activate backups quickly when needed.
Protect delivery timelines:
A healthy bench protects your delivery timelines without sacrificing quality when volumes spike or primary translators are unavailable for long term success.
Conclusion
- A structured translator onboarding process can reliably save at least 5 hours per week across your active projects. The savings come from eliminating repetitive questions, catching errors early with clear “done” criteria, and streamlining communication so your team focuses on production rather than coordination.
- The most impactful elements are straightforward: a clear brief that pre-answers common questions, a definition of done that removes ambiguity, a compact reference kit translators can absorb quickly, a calibration job that sets the quality baseline, and a single streamlined communication channel.
- Treat your onboarding materials as living assets that improve quality over time rather than one-off documents. Each calibration job, each LQA review, and each translator question reveals an opportunity to strengthen your materials.
- Your next step: Choose one language and one upcoming release to pilot these onboarding steps within the next month. Track your metrics, iterate on what doesn’t work, and scale what does.
FAQ
How long should a full translator onboarding take?
A compact but complete onboarding can usually be finished within 3–5 working days, spread over one calendar week. Here’s a sample schedule:
- Day 1: Deliver brief and reference kit; translator reviews materials
- Day 2: Tool access setup and walkthrough of key features
- Days 3–4: Calibration job with representative content
- Day 5: Feedback session and final alignment
For very complex domains like medical devices or regulated finance, you may need an additional week of domain training before the translator handles production content.
Can I reuse the same onboarding for agencies and individual freelancers?
Around 70–80% of your onboarding materials—the brief, reference kit, definition of done, and QA checklist—can be shared across both agencies and freelancers. However, each group needs some customization.
Agencies typically need extra process details: file handoff formats, batch sizes, and reporting templates. Freelancers usually need more clarity on payment terms, communication norms, and who to contact for different question types.
Maintain a single core onboarding package with small add-on pages customized per partner type.
How often should I update my translator onboarding materials?
Review key documents—your brief, style guide, and glossary—at least once per quarter or after any major product or brand change. Don’t wait for problems to accumulate.
Make lightweight updates continuously when calibration jobs or LQA reviews reveal recurring issues or new terminology. Version all documents with clear dates so translators always know they’re using the latest guidance.
What if translators push back on my “definition of done”?
Pushback is often a sign that criteria are unclear, unrealistic, or misaligned with the actual use case or budget. Rather than enforcing compliance, schedule a short discussion to walk through examples.
Adjust severities if needed and ensure expectations match the rates and timelines you’ve agreed upon. Once aligned, the definition of done should apply consistently to avoid ad-hoc exceptions that slow work and create confusion.
Do I still need onboarding if I use machine translation heavily?
Absolutely. Onboarding is still essential because humans remain responsible for post-editing, quality, and brand alignment—even when MT provides the first pass. According to industry research, 71% of enterprises now use machine translation in their workflows, but glossaries and onboarding materials significantly improve MT effectiveness.
Explain exactly how MT output will be used, what level of editing is expected (light vs. full), and how quality will be measured and compensated. Without this clarity, MT-heavy workflows often generate more rework and confusion, erasing the time savings you expected.
Table of Contents
- Introduction to Translator Onboarding
- Designing Your Translator Onboarding Workflow (Saving 5 Hours a Week)
- Start with a High-Impact Translator Brief
- Define “Done”: Your One-Page Acceptance Checklist
- Build a Translator Reference Kit They Can Absorb in 30 Minutes
- Choose and Configure the Right Tools for Translators
- Optimize Your Localization Process Inside the Tool
- Run a Calibration Job to Set the Quality Baseline
- Make Context Effortless for Translators
- Set Clean Communication Lines and Response SLAs
- Cover Legal, Security, and Compliance Up Front
- Align on Rates, Units, and Payment Rhythm
- Create Feedback and LQA Loops That Actually Improve Quality
- Pilot First, Then Scale Your Onboarding Template
- Respect UI and Layout Constraints from Day One
- Keep Terminology and Domain Knowledge Alive
- Measure What Actually Saves Time
- Maintaining a Healthy Bench of Onboarded Translators
- Conclusion
- FAQ
Ready to manage your Translation company easily?
Get Started for Free